

This is my family’s tried and true roasted turkey recipe that we use every year for Thanksgiving, as well as Passover and sometimes even Rosh Hashanah too! The ingredients, simple as they may be, impart a depth of flavor that is simply unmatched! My mouth is watering just thinking about it. The process is one that my Grandma Mala learned from her mom, whom I refer to as Grandma Ester.
Grandma Ester perished at Auschwitz in August, 1944, but her style of cooking survived with my Grandma, though it’s evolved slightly over the years. This recipe honors Grandma Ester’s memory, both with the flavors used and in how it brings our family together. That being said, turkeys weren’t widely available in pre-war Poland (they used goose for special occasions instead), so this recipe is well and truly Grandma Mala’s. This is the turkey that my mom, Carolyn, grew up with on her Thanksgiving table, and it’s the same one that taught me to absolutely love the holiday!
Despite the fact that my mom insists that the “cooking gene” skipped her and jumped straight to me, she always proved herself wrong when she would labor over our Thanksgiving turkey. When I was growing up, I would very eagerly anticipate Thanksgiving as the one day every year when my mom would spend the entire day in the kitchen, and I’d be her helper. We would baste the turkey with care, and I’d marvel at how natural my mom seemed in the kitchen, which she insisted was NOT her domain. She maintains that she has many other fine qualities, and she does! However, even though she doesn’t love to cook, my mom’s turkey always comes out tasting divine. These days, the tables have turned; I’m the one who roasts the turkey, and my mom helps me out along the way. It’s a tradition that we will always cherish together, and one that I am honored to share with you and your family as well!

All of the products that I used to create this recipe can be purchased using the links below:
Disclaimer: I may receive a small commission for the purchase of any product using the links provided on my website, at no additional cost to you.
Rinse the turkey (optional) and pat it down until it’s as dry as possible. Remove any extra feathers. In a small mixing bowl, combine the crushed garlic, salt, pepper, and margarine or butter to create a paste.

Place the bird, facing up, into a large roasting pan. Generously smear the paste over the entire top and sides of the bird, making sure to get into all the crevices. Repeat with the inside of the bird.

Flip the bird over so that its back is facing up and the breast is laying flat on the bottom of the roasting pan (don’t put it on a rack because it will dent the breasts). Smear the paste all over the back of the bird. With the back still facing up, either cover the roasting pan with a lid, foil, or wrap OR if you have enough space in your refrigerator to let it “breathe,” leave it uncovered to dry age. Refrigerate the turkey and let it brine for at least 24 hours or a maximum of 48 hours.
On the day you’re planning to eat the turkey, preheat the oven to 400°F. Prepare the stuffing, as directed on the box (though I like to add some mushrooms and onions).

Flip the turkey over in the pan and put the stuffing inside the cavity. Truss the opening. It’s okay for seasoning to fall off- just pat as much as you can back on. Flip the turkey back over, breast-side down. Liberally sprinkle paprika over the paste on the top and sides of the bird. Pour a large glass of water (about 12 oz) over the bird (the seasoning should stay put because of the oil content, and don’t worry if it doesn’t since you’ll be basting soon).

Have a baster or meat injector ready (a meat injector is better if you really value crispy skin) so that you can baste/inject the juice every 15-20 minutes.
Roast at 400°F for 30 minutes, then reduce the temperature to 350°F and begin basting/injecting. If at any point you notice the bottom getting dry or burnt, add more water. Roast the turkey for about 15 mins/lb (reduce this to 13 mins/lb if you chose not to stuff the turkey).

Using a set of turkey lifters (the sharp kitchen tools that look like small pitchforks), flip the turkey halfway through cooking so that it ends up with the breast facing up.

Sprinkle more paprika on the top and sides to fill in any that melted away or got scraped off in the process. If the skin begins burning at any point, put foil over the top, but this shouldn’t happen since you roasted it upside down for the first half of the cooking time.

Using a meat thermometer, check the temperature of the turkey by inserting the needle through the crease where the thigh meets the breast and stick it deep into the meat of the thigh. The turkey will be done when the temperature reaches 165°F, but since it will continue to cook as it rests, you can remove it when the temperature reads 160°F. However, the MOST important temperature is that of the stuffing, so make sure that the center of the stuffing has reached 165°F before removing the turkey from the oven. Rest for 20-30 minutes, or until it’s cooled enough to be able to carve. Untruss and serve carved or whole.

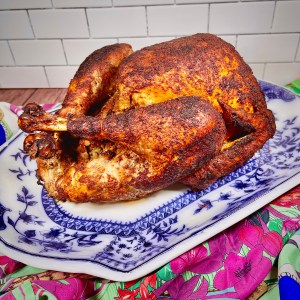
Because I use a meat injector, you can see swirls of seasoned garlic throughout the turkey breast.
(I removed the skin to serve as gribenes, or fried poultry skin in Yiddish)

Roasted Turkey
Equipment
- Roasting pan
- Meat injector (optional, but highly recommended)
- Baster
Ingredients
- 1 whole turkey (make sure to fully thaw the bird ahead of time if it was frozen), neck and giblets removed (you can save these to flavor gravy)
- 1-2 cups crushed garlic (from the jar, or you can make your own using about 5 heads of garlic)
- ¼ cup kosher salt (use a 1-2 Tbsps more if you're using a non-kosher turkey)
- 3 Tbsp black pepper
- 1 cup margarine (I recommend Earth Balance®) or butter, softened
- paprika
- stuffing mix, about ¾ cup per lb of turkey (we use the Pepperidge Farm® stuffing, but any will do)
- 12 oz water
Instructions
- Rinse the turkey (optional) and pat it down until it's as dry as possible. Remove any extra feathers.
- In a small mixing bowl, combine the crushed garlic, salt, pepper, and margarine or butter to create a paste.
- Place the bird, facing up, into a large roasting pan. Generously smear the paste over the entire top and sides of the bird, making sure to get into all the crevices. Repeat with the inside of the bird.
- an (don't put it on a rack because it will dent the breasts). Smear the paste all over the back of the bird. With the back still facing up, either cover the roasting pan with a lid, foil, or wrap OR if you have enough space in your refrigerator to let it "breathe," leave it uncovered to dry age. Refrigerate the turkey and let it brine for at least 24 hours or a maximum of 48 hours.
- On the day you're planning to eat the turkey, preheat the oven to 400°F. Prepare the stuffing, as directed on the box (though I like to add some mushrooms and onions).
- Flip the turkey over in the pan and put the stuffing inside the cavity. Truss the opening. Flip the turkey back over so that its back is facing up.
- Pour a large glass of water (about 12 oz) over the bird (the seasoning should stay put because of the oil content). Have a baster or meat injector ready (a meat injector is better if you really value crispy skin) so that you can baste/inject the juice every 15-20 minutes.
- Roast at 400°F for 30 minutes, then reduce the temperature to 350°F and begin basting/injecting. If at any point you notice the bottom getting dry or burnt, add more water. Roast the turkey for about 15 mins/lb (reduce this to 13 mins/lb if you chose not to stuff the turkey). Using a set of turkey lifters (the sharp kitchen tools that look like small pitchforks), flip the turkey halfway through cooking so that it ends up with the breast facing up. Sprinkle more paprika on the top and sides to fill in any that melted away or got scraped off in the process. If the skin begins burning at any point, put foil over the top, but this shouldn't happen since you roasted it upside down for the first half of the cooking time.
- Using a meat thermometer, check the temperature of the turkey by inserting the needle through the crease where the thigh meets the breast and stick it deep into the meat of the thigh. The turkey will be done when the temperature reaches 165°F, but since it will continue to cook as it rests, you can remove it when the temperature reads 160°F. However, the MOST important temperature is that of the stuffing, so make sure that the center of the stuffing has reached 165°F before removing the turkey from the oven.
- Rest for 20-30 minutes, or until it's cooled enough to be able to carve. Untruss and serve carved or whole.